
Halloweenspiration
Halloween is literally one of my favourite times of year; so much so that I'm convinced I was destined to grow up in America where they do everything bigger and better. And although I'm totally happy to spend £55 on a pair of coloured prescription contacts (you people with good eye sight don't understand the struggles), I know plenty of people who hate fancy dress. And even I'm not totally happy about spending loads on an outfit that I'll only ever wear once so why not just wear some bits you already have in your wardrobe and make it all about the makeup? But even if you go with that approach you may have to buy new things. For example if you were going to do a candy skull you'd need to buy white face paint. Well I've experimented with some makeup looks so that you don't have to and can instead just follow my step-by-step guides using only things that I already have in my makeup bag. Whether you want to be cute, creative or vaguely scary, I've got the look for you.

I figured this should be quite an easy one but I underestimated how hard it would actually be to make my eyebrows appear smaller without actually plucking them thin and therefore ruining them forever. This would work with any remotely girly outfit; I tried it on with this pink and cream lace top and I think it would be cute for any really anti-fancy-dress people.

I wanted to make my skin look perfect like a china doll so I applied 2 layers of Wake me up foundation, which I buffed in and built up gradually using a Real techniques brush. I also added powder and then a warm blusher by No7 in the shade Soft apricot.

Then for the tricky bit. I have really light eyebrows (or so I thought) and so I didn't think it would be very hard to cover them with makeup but it's actually really difficult! After foundation, I used a very precise eyebrow pencil (brow satin by Maybelline) to draw a line straight through my natural brows and then used small lines upwards to create the look of painted on brows like a doll has. Then I used the highlighter end of the soap and glory brow pencil to cover the eyebrow hairs underneath (it had to be built up gradually and blended after each application).

Then for the 'broken' part. You basically have to "harry potter yourself" and draw lightning shaped marks wherever you want them. I used a felt tip eyeliner because it's easier to be precise than with a liquid eyeliner.

Then you have to try and make your eyes look bigger. Which was hard because I have quite small eyes anyway. I really didn't task myself with an easy one when I think about it. I used the same highlighter pencil underneath my eyes and round the corners because its really brightening and it's quite chunky so it's easier to apply than a standard white eyeliner. Then I used black eyeliner underneath and along my actual lash line, and then added wings and doll eyelashes along the bottom. I also used eyeshadow from my Naked palette; Sin all over my lids and then Toasted through my crease.

I finished with false lashes and then a barbie pink lipstick; this one is from the Kate Moss Rimmel collection and is shade 05.

One that's actually remotely Halloween themed! Although I'm worried it might've got a bit lost in translation because both my mum and dad thought I was meant to be Pinocchio. Don't mind my sex positions poster in the background; it was a joke gift for my 17th birthday. This one is probably the simplest of all the looks I created and I forgot to take a photo of the products I used but there wasn't many anyway.

I started with the same foundation base but this time I filled in my brows lightly with an angled Zoeva brush and Buck eyeshadow from my Naked palette.

I wanted a kind of messy and really dark eye so I used a super fluffy Zoeva brush and blended the shade Deep purple (Lorac palette) all round my eyes and then added Black over the top of that. I lined my eyes, along my upper and lower lashline using a black pencil eyeliner.

Then for the fun bit. The red swirls are the iconic part of the look but I didn't want to mess up one of my favourite red lipsticks so I used Ruby Woo (which I've had for years and so it's dried up). I added a little dark eyeshadow round each spiral to finish it.

I finished with black lines from the corners of my lips down to my chin (using black felt tip eyeliner) and then finished with red lipstick using my favourite instead; my beautiful Chanel.


I've thought this was really cool ever since I first saw the idea and wanted to attempt it myself. Although I seriously underestimated the staying power of this lip pen and so the Lichtenstein dots took some proper scrubbing off.

This one was really fun to do because it was easy to be inventive. I started with my trusty felt tip eyeliner and drew all the outlines; along my cheekbones, lines on my chin and down my nose, then over my eyebrows, under my eyes and into a tear shape.

Then I added some colour! I used a bright blue eyeshadow from my 17 palette, using a teeny tiny Zoeva brush, to fill in the the tear shape and then I used the same Kate Moss lipstick from the previous look over my eye lids. It did look good because it's so bright but it felt so sticky and gross and made my eyelids stick together - not pleasant.

I loved the lips on this look too. I really got my use out of this Kate Moss lipstick in this halloween lookbook; I left a little gap on my bottom lip and added some white eyeshadow as a highlight. I also lined my lined my lips with my black eyeliner pen.

This was the really fun (and really tedious) bit. I used a lip stain pen by Revlon in the shade Passion to draw tiny dots all over my face. It seemed to take hours but doesn't it look cool?

And then I finished off the look with fake eyelashes and a very pouty expression. I did try to smile for the photos but it just didn't work with the eyebrows.


This one is the least Halloween themed and yet it's my favourite! This bambi look is really cute and actually took a lot more work than I thought because all the makeup needed building up so much.

I started by tracing along my cheekbones using Buck eyeshadow and then added lots of dark contour powder along the tops of my cheeks, round my temples and along my forehead. I had to build this up to get it dark enough to be a convincing deer colour.

Then I added light powder to the centre of my face and filled my brows in really strongly using Espresso eyeshadow (Lorac palette) on a Zoeva brush. These white dots took a lot longer than they should've; I wet a concealer buffer brush (by Zoeva again) and then dabbed on plenty of white eyeshadow until I had a really strong colour.

Then I drew lines down my nose and drew a deer-like nose using black felt tip liner, and joined to my eyebrows at the top.

I added more white eyeshadow underneath my eyes (my white eyeshadow got a serious beating today) and then drew thick black eyeliner underneath my eyes and along my lashline, adding a cat flick.


I finished with fake eyelashes and Velvet teddy lipstick; I added white eyeshadow over the top to get this ombre kind of style. I hope this has inspired you in some way although you'll have to wait a week to find out what I'm actually being for halloween. The only hint you can have is that I'll be wearing £55 contact lenses. It's suddenly dawning on me why I never have any money.
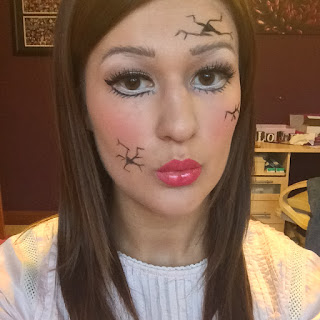
Broken doll


I figured this should be quite an easy one but I underestimated how hard it would actually be to make my eyebrows appear smaller without actually plucking them thin and therefore ruining them forever. This would work with any remotely girly outfit; I tried it on with this pink and cream lace top and I think it would be cute for any really anti-fancy-dress people.

I wanted to make my skin look perfect like a china doll so I applied 2 layers of Wake me up foundation, which I buffed in and built up gradually using a Real techniques brush. I also added powder and then a warm blusher by No7 in the shade Soft apricot.

Then for the tricky bit. I have really light eyebrows (or so I thought) and so I didn't think it would be very hard to cover them with makeup but it's actually really difficult! After foundation, I used a very precise eyebrow pencil (brow satin by Maybelline) to draw a line straight through my natural brows and then used small lines upwards to create the look of painted on brows like a doll has. Then I used the highlighter end of the soap and glory brow pencil to cover the eyebrow hairs underneath (it had to be built up gradually and blended after each application).

Then for the 'broken' part. You basically have to "harry potter yourself" and draw lightning shaped marks wherever you want them. I used a felt tip eyeliner because it's easier to be precise than with a liquid eyeliner.

Then you have to try and make your eyes look bigger. Which was hard because I have quite small eyes anyway. I really didn't task myself with an easy one when I think about it. I used the same highlighter pencil underneath my eyes and round the corners because its really brightening and it's quite chunky so it's easier to apply than a standard white eyeliner. Then I used black eyeliner underneath and along my actual lash line, and then added wings and doll eyelashes along the bottom. I also used eyeshadow from my Naked palette; Sin all over my lids and then Toasted through my crease.

I finished with false lashes and then a barbie pink lipstick; this one is from the Kate Moss Rimmel collection and is shade 05.
Jigsaw from Saw

One that's actually remotely Halloween themed! Although I'm worried it might've got a bit lost in translation because both my mum and dad thought I was meant to be Pinocchio. Don't mind my sex positions poster in the background; it was a joke gift for my 17th birthday. This one is probably the simplest of all the looks I created and I forgot to take a photo of the products I used but there wasn't many anyway.

I started with the same foundation base but this time I filled in my brows lightly with an angled Zoeva brush and Buck eyeshadow from my Naked palette.

I wanted a kind of messy and really dark eye so I used a super fluffy Zoeva brush and blended the shade Deep purple (Lorac palette) all round my eyes and then added Black over the top of that. I lined my eyes, along my upper and lower lashline using a black pencil eyeliner.

Then for the fun bit. The red swirls are the iconic part of the look but I didn't want to mess up one of my favourite red lipsticks so I used Ruby Woo (which I've had for years and so it's dried up). I added a little dark eyeshadow round each spiral to finish it.

I finished with black lines from the corners of my lips down to my chin (using black felt tip eyeliner) and then finished with red lipstick using my favourite instead; my beautiful Chanel.
Pop art


I've thought this was really cool ever since I first saw the idea and wanted to attempt it myself. Although I seriously underestimated the staying power of this lip pen and so the Lichtenstein dots took some proper scrubbing off.

This one was really fun to do because it was easy to be inventive. I started with my trusty felt tip eyeliner and drew all the outlines; along my cheekbones, lines on my chin and down my nose, then over my eyebrows, under my eyes and into a tear shape.

Then I added some colour! I used a bright blue eyeshadow from my 17 palette, using a teeny tiny Zoeva brush, to fill in the the tear shape and then I used the same Kate Moss lipstick from the previous look over my eye lids. It did look good because it's so bright but it felt so sticky and gross and made my eyelids stick together - not pleasant.

I loved the lips on this look too. I really got my use out of this Kate Moss lipstick in this halloween lookbook; I left a little gap on my bottom lip and added some white eyeshadow as a highlight. I also lined my lined my lips with my black eyeliner pen.

This was the really fun (and really tedious) bit. I used a lip stain pen by Revlon in the shade Passion to draw tiny dots all over my face. It seemed to take hours but doesn't it look cool?

And then I finished off the look with fake eyelashes and a very pouty expression. I did try to smile for the photos but it just didn't work with the eyebrows.
Bambi


This one is the least Halloween themed and yet it's my favourite! This bambi look is really cute and actually took a lot more work than I thought because all the makeup needed building up so much.

I started by tracing along my cheekbones using Buck eyeshadow and then added lots of dark contour powder along the tops of my cheeks, round my temples and along my forehead. I had to build this up to get it dark enough to be a convincing deer colour.

Then I added light powder to the centre of my face and filled my brows in really strongly using Espresso eyeshadow (Lorac palette) on a Zoeva brush. These white dots took a lot longer than they should've; I wet a concealer buffer brush (by Zoeva again) and then dabbed on plenty of white eyeshadow until I had a really strong colour.

Then I drew lines down my nose and drew a deer-like nose using black felt tip liner, and joined to my eyebrows at the top.

I added more white eyeshadow underneath my eyes (my white eyeshadow got a serious beating today) and then drew thick black eyeliner underneath my eyes and along my lashline, adding a cat flick.


I finished with fake eyelashes and Velvet teddy lipstick; I added white eyeshadow over the top to get this ombre kind of style. I hope this has inspired you in some way although you'll have to wait a week to find out what I'm actually being for halloween. The only hint you can have is that I'll be wearing £55 contact lenses. It's suddenly dawning on me why I never have any money.


Comments
Post a Comment